The GLAD Force Graph or Force Directed Graph provides a network based visualization of the microarray data. This visualization makes it very easy to see what are the common glycans binding to two or more samples. Alternatively, it can help identify common binding motifs for a particular sample.
Creating a Force Graph
To create a Force Graph:
- Make sure you have appropriate selections loaded.
- Check the force graph settings and adjust them to your liking by clicking on the
 next to the Force Graph button. The explanation for all the settings is given below.
 - Click on the
 button to create the Force Graph
Understanding How the Force Graph is Made
The calculations involved in performing the force simulation is as follows:
- Creating nodes for all samples and glycans in a given field. The sample nodes are colored by the Data Color which was selected for them, while the color of the glycan nodes is grey. The size of the sample nodes is also larger as compared to the glycan nodes.
- Links are made based on the strength of binding between the sample and glycans which is determined by the RFU values between them. If the RFU value is less than the Force Range Min option, no links are made.
- The calculation to determine the distance between the nodes is performed as follows:
( 1-(RFU value / Force Range Max value) ) * Link DistanceNote: the distance calculation above is just a reference. Once the force simulation runs, the actual distance between the nodes depends on several other factors.
- A force is then applied to repel the nodes away from each other in a simulation till it stabilizes to give the final Force Graph figure.
Force Graph Settings
 Force Range
- Min: the minimum RFU below which links are not made
- Max: the maximum RFU in the dataset above which the values are treated the same. This can be either a set number, or you can let GLAD “Auto Find Maximum” for your data.
- Ignore Non-Binders: Non-binders are those glycan nodes which do not show any binding above the Min value set above. By default this option is selected and it prevents extra calculations for these glycans thereby reducing the amount of processing required to produce the Force Graph. If unchecked, all glycans will be presented as nodes and may cause slower rendering of large datasets.
- Force Strength: Defines the strength of repulsion between the nodes. A default value of -30 is set, but any value between -1 to -100 is accepted. The value must be negative in order to cause repulsion between the nodes.
- Link Distance: Defines the distance between the nodes. Note that the actual distance between the nodes would depend on how many nodes bind to it and several other factors. Changing this value will only help to spread out or bring closer the nodes in general.
The video below shows how different settings have an effect on the rendered Force Graph.
Navigating Within the Force Graph
Force graph navigation involves Mouse Controls and Search and Highlight Glycans options.
Mouse Controls
You can navigate within a Force Graph using the following controls on the Nodes:
- Click and Drag: This allows you to move the nodes around to visualize the data better. It reperforms the simulation when you do this.
- Mouse over: Shows either the Sample Data Title (in case of colored nodes) or the Glycan ID and Name (for the glycan grey colored nodes) in the top left corner. Additionally, If the Glycan Structure drawer is open, you can view the structure of the Glycan Nodes when you mouse over the grey nodes.
- Double Click: when you double click a node, it shows its binding partners in a a more clear manner as it reduces the opacity of all other nodes and links in the Force Graph. This can be very useful to identify common binding partners.
- Ctrl + Click: saves the glycan structure into the Selected Structures drawer.
Search and Highlight Glycans
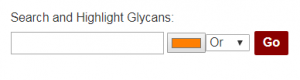 You can use the Search and Highlight (outline) Glycans function to highlight glycan nodes which contain specific Name characteristics. For example, you can type in “GlcNAc,Gala,Galb” in the input field, select the color, and choose the option Or or And and click Go.
- Or: highlights glycan nodes which have names containing either of the comma separated query values. For the above example, it would highlight all glycans which have either GlcNAc or Gala or Galb in the Name.
- And: highlights glycan nodes which have names containing all of the comma separated query values. For the above example, it would highlight all glycans which have both GlcNAc and Gala or Galb in the Name.
- Note- the reason why we have to specify Gala and Galb is so that the software can differentiate Galactose (Gal) from N-Acetyl Galactosamine (GalNAc). This is because the abbreviation GalNAc includes Gal and hence if only Gal was specified, it would select GalNAc as well. Since we want to specifically select only galactose, we have to write Gala,Galb in the query which would include Galactose – alpha and beta.
- You can even highlight in consecutive order if you want to show specific glycan containing nodes with separate colors.
- To clear the highlights, just clear the query and click on Go.